2. Installation
This chapter will describe how to get, compile and run the software.
ESPResSo releases are available as source code packages from the homepage 1. This is where new users should get the code. The code within release packages is tested and known to run on a number of platforms. Alternatively, people that want to use the newest features of ESPResSo or that want to start contributing to the software can instead obtain the current development code via the version control system software 2 from ESPResSo’s project page at Github 3. This code might be not as well tested and documented as the release code; it is recommended to use this code only if you have already gained some experience in using ESPResSo.
Unlike most other software, no binary distributions of ESPResSo are available, and the software is usually not installed globally for all users. Instead, users of ESPResSo should compile the software themselves. The reason for this is that it is possible to activate and deactivate various features before compiling the code. Some of these features are not compatible with each other, and some of the features have a profound impact on the performance of the code. Therefore it is not possible to build a single binary that can satisfy all needs. For performance reasons a user should always activate only those features that are actually needed. This means, however, that learning how to compile is a necessary evil. The build system of ESPResSo uses CMake 4 to compile software easily on a wide range of platforms.
2.1. Requirements
The following tools and libraries, including their header files, are required to be able to compile and use ESPResSo:
- CMake
The build system is based on CMake.
- C++ compiler
The C++ core of ESPResSo needs to be built by a C++14-capable compiler.
- Boost
A number of advanced C++ features used by ESPResSo are provided by Boost. We strongly recommend to use at least Boost 1.71.
- FFTW
For some algorithms like P\(^3\)M, ESPResSo needs the FFTW library version 3 or later 5 for Fourier transforms, including header files.
- MPI
An MPI library that implements the MPI standard version 1.2 is required to run simulations in parallel. ESPResSo is currently tested against Open MPI and MPICH, with and without UCX enabled. Other MPI implementations like Intel MPI should also work, although they are not actively tested in ESPResSo continuous integration.
- Python
ESPResSo’s main user interface relies on Python 3.
- Cython
Cython is used for connecting the C++ core to Python.
2.1.1. Installing requirements on Ubuntu Linux
To compile ESPResSo on Ubuntu 22.04 LTS, install the following dependencies:
sudo apt install build-essential cmake cython3 python3-pip python3-numpy \
  libboost-all-dev openmpi-common fftw3-dev libhdf5-dev libhdf5-openmpi-dev \
  python3-scipy python3-opengl libgsl-dev
Optionally the ccmake utility can be installed for easier configuration:
sudo apt install cmake-curses-gui
2.1.1.1. Nvidia GPU acceleration
If your computer has an Nvidia graphics card, you should also download and install the CUDA SDK to make use of GPU computation:
sudo apt install nvidia-cuda-toolkit
On Ubuntu 22.04, the default GCC compiler is too recent for nvcc and will fail
to compile sources that rely on std::function. You can either use GCC 10:
CC=gcc-10 CXX=g++-10 cmake .. -D WITH_CUDA=ON
make -j
or alternatively install Clang 12 as a replacement for nvcc and GCC:
CC=clang-12 CXX=clang++-12 cmake .. -D WITH_CUDA=ON -D WITH_CUDA_COMPILER=clang
make -j
On Ubuntu 20.04, the default GCC compiler is also too recent for nvcc and will
generate compiler errors. You can either install an older version of GCC and
select it with environment variables CC and CXX when building ESPResSo,
or edit the system header files as shown in the following
patch for Ubuntu 20.04.
2.1.1.2. Requirements for building the documentation
To generate the Sphinx documentation, install the following packages:
pip3 install --user \
    'sphinx>=2.3.0,!=3.0.0' \
    'sphinxcontrib-bibtex>=2.4.1' \
    'sphinx-toggleprompt==0.0.5'
To generate the Doxygen documentation, install the following packages:
sudo apt install doxygen graphviz
2.1.1.3. Setting up a Jupyter environment
To run the samples and tutorials, start by installing the following packages:
sudo apt install python3-matplotlib python3-pint python3-tqdm ffmpeg
pip3 install --user 'MDAnalysis>=1.0.0,<2.0.0'
The tutorials are written in the Notebook Format version <= 4.4 and can be executed by any of these tools:
IPython (not recommended)
To check whether one of them is installed, run these commands:
jupyter notebook --version
jupyter lab --version
ipython --version
If you don’t have any of these tools installed and aren’t sure which one
to use, we recommend installing the historic Jupyter Notebook, since the
ESPResSo tutorials have been designed with the exercise2 plugin in mind.
To use Jupyter Notebook, install the following packages:
pip3 install --user nbformat notebook 'jupyter_contrib_nbextensions==0.5.1'
jupyter contrib nbextension install --user
jupyter nbextension enable rubberband/main
jupyter nbextension enable exercise2/main
Alternatively, to use JupyterLab, install the following packages:
pip3 install --user nbformat notebook jupyterlab
2.1.2. Installing requirements on other Linux distributions
Please refer to the following Dockerfiles to find the minimum set of packages required to compile ESPResSo on other Linux distributions:
2.1.3. Installing requirements on Windows via WSL
To run ESPResSo on Windows, use the Linux subsystem. For that you need to
follow these instructions to install Ubuntu
start Ubuntu (or open an Ubuntu tab in Windows Terminal)
execute
sudo apt updateto prepare the installation of dependenciesoptional step: If you have a NVIDIA graphics card available and want to make use of ESPResSo’s GPU acceleration, follow these instructions to set up CUDA.
follow the instructions for Installing requirements on Ubuntu Linux
2.1.4. Installing requirements on macOS
To build ESPResSo on macOS 10.15 or higher, you need to install its dependencies. There are two possibilities for this, MacPorts and Homebrew. We strongly recommend Homebrew, but if you already have MacPorts installed, you can use that too, although we do not provide MacPorts installation instructions.
To check whether you already have one or the other installed, run the following commands:
test -e /opt/local/bin/port && echo "MacPorts is installed"
test -e /usr/local/bin/brew && echo "Homebrew is installed"
If Homebrew is already installed, you should resolve any problems reported by the command
brew doctor
If you want to install Homebrew, follow the installation instructions at https://docs.brew.sh/Installation, but bear in mind that MacPorts and Homebrew may conflict with one another.
If Anaconda Python or the Python from www.python.org are installed, you will likely not be able to run ESPResSo. Therefore, please uninstall them using the following commands:
sudo rm -r ~/anaconda[23]
sudo rm -r /Library/Python
2.1.4.1. Installing packages using Homebrew
Run the following commands:
brew install cmake python cython boost boost-mpi fftw \
  doxygen gsl numpy scipy ipython jupyter
brew install hdf5-mpi
brew link --force cython
pip install PyOpenGL matplotlib
2.2. Quick installation
If you have installed the requirements (see section Requirements) in
standard locations, compiling ESPResSo is usually only a matter of creating a build
directory and calling cmake and make in it. See for example the command
lines below (optional steps which modify the build process are commented out):
mkdir build
cd build
cmake ..
#ccmake . // in order to add/remove features like ScaFaCoS or CUDA
make -j
This will build ESPResSo with a default feature set, namely
src/config/myconfig-default.hpp. This file is a C++ header file,
which defines the features that should be compiled in.
You may want to adjust the feature set to your needs. This can be easily
done by copying the myconfig-sample.hpp which has been created in
the build directory to myconfig.hpp and only uncomment
the features you want to use in your simulation.
The cmake command looks for libraries and tools needed by ESPResSo.
So ESPResSo can only be built if cmake reports no errors.
The command make will compile the source code. Depending on the
options passed to the program, make can also be used for a number of
other things:
It can install and uninstall the program to some other directories. However, normally it is not necessary to actually install to run it:
make installIt can invoke code checks:
make checkIt can build this documentation:
make sphinx
When these steps have successfully completed, ESPResSo can be started with the command:
./pypresso script.py
where script.py is a Python script which has to be written by the user.
You can find some examples in the samples folder of the source code
directory. If you want to run in parallel, you should have compiled with an
MPI library, and need to tell MPI to run in parallel.
The actual invocation is implementation-dependent, but in many cases, such as
Open MPI and MPICH, you can use
mpirun -n 4 ./pypresso script.py
where 4 is the number of processors to be used.
2.3. Features
This chapter describes the features that can be activated in ESPResSo. Even if possible, it is not recommended to activate all features, because this will negatively affect ESPResSo’s performance.
Features can be activated in the configuration header myconfig.hpp
(see section myconfig.hpp: Activating and deactivating features).
To activate FEATURE, add the following line to the header file:
#define FEATURE
2.3.1. General features
ELECTROSTATICSThis enables the use of the various electrostatics algorithms, such as P3M.See also
MMM1D_GPU: This enables MMM1D on GPU. It is faster than the CPU version by several orders of magnitude, but has float precision instead of double precision.MMM1D_MACHINE_PREC: This enables high-precision Bessel functions for MMM1D on CPU. Comes with a 60% slow-down penalty. The low-precision functions are enabled by default and are precise enough for most applications.DIPOLESThis activates the dipole-moment property of particles and switches on various magnetostatics algorithmsSee also
SCAFACOS_DIPOLESThis activates magnetostatics methods of ScaFaCoS.DIPOLAR_DIRECT_SUMThis activates the GPU implementation of the dipolar direct sum.ROTATIONSwitch on rotational degrees of freedom for the particles, as well as the corresponding quaternion integrator.See also
Note
When this feature is activated, every particle has three additional degrees of freedom, which for example means that the kinetic energy changes at constant temperature is twice as large.
THERMOSTAT_PER_PARTICLEAllows setting a per-particle friction coefficient for the Langevin and Brownian thermostats.ROTATIONAL_INERTIAEXTERNAL_FORCESAllows to define an arbitrary constant force for each particle individually. Also allows to fix individual coordinates of particles, keep them at a fixed position or within a plane.MASSAllows particles to have individual masses. Note that some analysis procedures have not yet been adapted to take the masses into account correctly.EXCLUSIONSAllows to exclude specific short ranged interactions within molecules.BOND_CONSTRAINTTurns on the RATTLE integrator which allows for fixed lengths bonds between particles.VIRTUAL_SITES_RELATIVEVirtual sites are particles, the position and velocity of which is not obtained by integrating equations of motion. Rather, they are placed using the position (and orientation) of other particles. The feature allows for rigid arrangements of particles.See also
COLLISION_DETECTIONAllows particles to be bound on collision.
In addition, there are switches that enable additional features in the integrator or thermostat:
NPTEnables an on-the-fly NpT integration scheme.See also
ENGINEPARTICLE_ANISOTROPY
2.3.2. Fluid dynamics and fluid structure interaction
DPDEnables the dissipative particle dynamics thermostat and interaction.See also
LB_BOUNDARIESLB_BOUNDARIES_GPULB_ELECTROHYDRODYNAMICSEnables the implicit calculation of electro-hydrodynamics for charged particles and salt ions in an electric field.ELECTROKINETICSEK_BOUNDARIESEK_DEBUG
2.3.3. Interaction features
The following switches turn on various short ranged interactions (see section Isotropic non-bonded interactions):
TABULATEDEnable support for user-defined non-bonded interaction potentials.LENNARD_JONESEnable the Lennard-Jones potential.LENNARD_JONES_GENERICEnable the generic Lennard-Jones potential with configurable exponents and individual prefactors for the two terms.LJCOSEnable the Lennard-Jones potential with a cosine-tail.LJCOS2Same asLJCOS, but using a slightly different way of smoothing the connection to 0.WCAEnable the Weeks–Chandler–Andersen potential.GAY_BERNEEnable the Gay–Berne potential.HERTZIANEnable the Hertzian potential.MORSEEnable the Morse potential.BUCKINGHAMEnable the Buckingham potential.SOFT_SPHEREEnable the soft sphere potential.SMOOTH_STEPEnable the smooth step potential, a step potential with two length scales.BMHTF_NACLEnable the Born–Meyer–Huggins–Tosi–Fumi potential, which can be used to model salt melts.GAUSSIANEnable the Gaussian potential.HATEnable the Hat potential.
Some of the short-range interactions have additional features:
LJGEN_SOFTCOREThis modifies the generic Lennard-Jones potential (LENNARD_JONES_GENERIC) with tunable parameters.THOLESee Thole correction
2.3.4. Debug messages
Finally, there is a flag for debugging:
ADDITIONAL_CHECKSEnables numerous additional checks which can detect inconsistencies especially in the cell systems. These checks are however too slow to be enabled in production runs.Note
Because of a bug in OpenMPI versions 2.0-2.1, 3.0.0-3.0.2 and 3.1.0-3.1.2 that causes a segmentation fault when running the ESPResSo OpenGL visualizer with feature
ADDITIONAL_CHECKSenabled together with eitherELECTROSTATICSorDIPOLES, the subset of additional checks for those two features are disabled if an unpatched version of OpenMPI is detected during compilation.
2.3.5. External features
External features cannot be added to the myconfig.hpp file by the user.
They are added by CMake if the corresponding dependency was found on the
system. Some of these external features are optional and must be activated
using a CMake flag (see Options and Variables).
CUDAEnables GPU-specific features.FFTWEnables features relying on the fast Fourier transforms, e.g. P3M.H5MDWrite data to H5MD-formatted hdf5 files (see Writing H5MD-files)SCAFACOSEnables features relying on the ScaFaCoS library (see ScaFaCoS electrostatics, ScaFaCoS magnetostatics).GSLEnables features relying on the GNU Scientific Library, e.g.espressomd.cluster_analysis.Cluster.fractal_dimension().STOKESIAN_DYNAMICSEnables the Stokesian Dynamics feature (see Stokesian Dynamics). Requires BLAS and LAPACK.
2.4. Configuring
2.4.1. myconfig.hpp: Activating and deactivating features
ESPResSo has a large number of features that can be compiled into the binary.
However, it is not recommended to actually compile in all possible
features, as this will slow down ESPResSo significantly. Instead, compile in only
the features that are actually required. A strong gain in speed can be
achieved by disabling all non-bonded interactions except for a single
one, e.g. LENNARD_JONES. For developers, it is also possible to turn on or off a
number of debugging messages. The features and debug messages can be
controlled via a configuration header file that contains C-preprocessor
declarations. Subsection Features describes all available features. If a
file named myconfig.hpp is present in the build directory when cmake
is run, all features defined in it will be compiled in. If no such file exists,
the configuration file src/config/myconfig-default.hpp will be used
instead, which turns on the default features.
When you distinguish between the build and the source directory, the configuration header can be put in either of these. Note, however, that when a configuration header is found in both directories, the one in the build directory will be used.
By default, the configuration header is called myconfig.hpp.
The configuration header can be used to compile different binary
versions of with a different set of features from the same source
directory. Suppose that you have a source directory $srcdir and two
build directories $builddir1 and $builddir2 that contain
different configuration headers:
$builddir1/myconfig.hpp:#define ELECTROSTATICS #define LENNARD_JONES
$builddir2/myconfig.hpp:#define LJCOS
Then you can simply compile two different versions of ESPResSo via:
cd $builddir1
cmake ..
make

cd $builddir2
cmake ..
make
To see what features were activated in myconfig.hpp, run:
./pypresso
and then in the Python interpreter:
import espressomd
print(espressomd.features())
2.4.2. cmake
In order to build the first step is to create a build directory in which
cmake can be executed. In cmake, the source directory (that contains
all the source files) is completely separated from the build directory
(where the files created by the build process are put). cmake is
designed to not be executed in the source directory. cmake will
determine how to use and where to find the compiler, as well as the
different libraries and tools required by the compilation process. By
having multiple build directories you can build several variants of ESPResSo,
each variant having different activated features, and for as many
platforms as you want.
Once you’ve run ccmake, you can list the configured variables with
cmake -LAH -N . | less (uses a pager) or with ccmake .. and pressing
key t to toggle the advanced mode on (uses the curses interface).
Example:
When the source directory is srcdir (the files where unpacked to this
directory), then the user can create a build directory build below that
path by calling mkdir srcdir/build. In the build directory cmake is to be
executed, followed by a call to make. None of the files in the source directory
are ever modified by the build process.
cd build
cmake ..
make -j
Afterwards ESPResSo can be run by calling ./pypresso from the command line.
2.4.3. ccmake
Optionally and for easier use, the curses interface to cmake can be used to configure ESPResSo interactively.
Example:
Alternatively to the previous example, instead of cmake, the ccmake executable is called in the build directory to configure ESPResSo, followed by a call to make:
cd build
ccmake ..
make
Fig. ccmake interface shows the interactive ccmake UI.
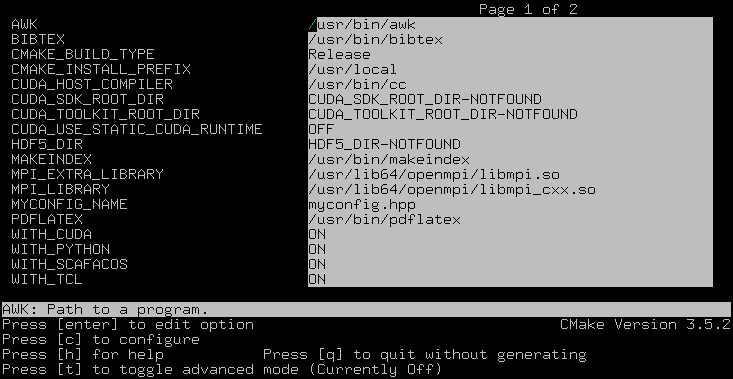
ccmake interface
2.4.4. Options and Variables
The behavior of ESPResSo can be controlled by means of options and variables
in the CMakeLists.txt file. Also options are defined there.
The following options are available:
WITH_CUDA: Build with GPU supportWITH_HDF5: Build with HDF5WITH_TESTS: Enable testsWITH_SCAFACOS: Build with ScaFaCoS supportWITH_STOKESIAN_DYNAMICSBuild with Stokesian Dynamics supportWITH_VALGRIND_INSTRUMENTATION: Build with valgrind instrumentation markers
When the value in the CMakeLists.txt file is set to ON, the
corresponding option is created; if the value of the option is set to OFF,
the corresponding option is not created. These options can also be modified
by calling cmake with the command line argument -D:
cmake -D WITH_HDF5=OFF ..
When an option is activated, additional options may become available.
For example with -D WITH_CUDA=ON, one can choose the CUDA compiler with
-D WITH_CUDA_COMPILER=<compiler_id>, where <compiler_id> can be
nvcc (default) or clang.
Environment variables can be passed to CMake. For example, to select Clang, use
CC=clang CXX=clang++ cmake .. -DWITH_CUDA=ON -DWITH_CUDA_COMPILER=clang.
If you have multiple versions of the CUDA library installed, you can select the
correct one with CUDA_BIN_PATH=/usr/local/cuda-10.0 cmake .. -DWITH_CUDA=ON
(with Clang as the CUDA compiler, you also need to override its default CUDA
path with -DCMAKE_CXX_FLAGS=--cuda-path=/usr/local/cuda-10.0).
2.4.4.1. Build types and compiler flags
The build type is controlled by -D CMAKE_BUILD_TYPE=<type> where
<type> can take one of the following values:
Release: for production use: disables assertions and debug information, enables-O3optimization (this is the default)RelWithAssert: for debugging purposes: enables assertions and-O3optimization (use this to track the source of a fatal error)Debug: for debugging in GDBCoverage: for code coverage
Cluster users and HPC developers may be interested in manually editing the
Espresso_cpp_flags target in the top-level CMakeLists.txt file for
finer control over compiler flags. The variable declaration is followed
by a series of conditionals to enable or disable compiler-specific flags.
Compiler flags passed to CMake via the -DCMAKE_CXX_FLAGS option
(such as cmake . -DCMAKE_CXX_FLAGS="-ffast-math -fno-finite-math-only")
will appear in the compiler command before the flags in Espresso_cpp_flags,
and will therefore have lower precedence.
Be aware that fast-math mode can break ESPResSo. It is incompatible with the
ADDITIONAL_CHECKS feature due to the loss of precision in the LB code
on CPU. The Clang 10 compiler breaks field couplings with -ffast-math.
The Intel compiler enables the -fp-model fast=1 flag by default;
it can be disabled by adding the -fp-model=strict flag.
ESPResSo currently doesn’t fully support link-time optimization (LTO).
2.4.5. Configuring without a network connection
Several external features in ESPResSo rely on external libraries that are downloaded automatically by CMake. When a network connection cannot be established due to firewall restrictions, the CMake logic needs editing:
WITH_HDF5: when cloning ESPResSo, thelibs/h5xxfolder will be a git submodule containing a.gitsubfolder. To prevent CMake from updating this submodule with git, delete the corresponding command with:sed -i '/execute_process(COMMAND ${GIT_EXECUTABLE} submodule update -- libs\/h5xx/,+1 d' CMakeLists.txtWhen installing a release version of ESPResSo, no network communication is needed for HDF5.
WITH_STOKESIAN_DYNAMICS: this library is installed using FetchContent. The repository URL can be found in theGIT_REPOSITORYfield of the correspondingFetchContent_Declare()command. TheGIT_TAGfield provides the commit. Clone this repository locally next to the ESPResSo folder and edit the ESPResSo build system such thatGIT_REPOSITORYpoints to the absolute path of the Stokesian Dynamics clone, for example with:sed -ri 's|GIT_REPOSITORY +.+stokesian-dynamics.git|GIT_REPOSITORY /work/username/stokesian_dynamics|' CMakeLists.txt
2.5. Compiling, testing and installing
The command make is mainly used to compile the source code, but it
can do a number of other things. The generic syntax of the make
command is:
make [options] [target] [variable=value]
When no target is given, the target all is used. The following
targets are available:
allCompiles the complete source code. The variable can be used to specify the name of the configuration header to be used.
checkRuns the testsuite. By default, all available tests will be run on 1, 2, 3, 4, 6, or 8 processors.
testDo not use this target, it is a broken feature (see issue #4370). Use
make checkinstead.cleanDeletes all files that were created during the compilation.
installInstall ESPResSo in the path specified by the CMake variable
CMAKE_INSTALL_PREFIX. The path can be changed by calling CMake withcmake .. -DCMAKE_INSTALL_PREFIX=/path/to/espresso. Do not usemake DESTDIR=/path/to/espresso installto install to a specific path, this will cause issues with the runtime path (RPATH) and will conflict with the CMake variableCMAKE_INSTALL_PREFIXif it has been set.doxygenCreates the Doxygen code documentation in the
doc/doxygensubdirectory.sphinxCreates the
sphinxcode documentation in thedoc/sphinxsubdirectory.tutorialsCreates the tutorials in the
doc/tutorialssubdirectory.docCreates all documentation in the
docsubdirectory (only when using the development sources).
A number of options are available when calling make. The most
interesting option is probably -j num_jobs, which can be used for
parallel compilation. num_jobs specifies the maximal number of
concurrent jobs that will be run. Setting num_jobs to the number
of available processors speeds up the compilation process significantly.
2.6. Troubleshooting
If you encounter issues when building ESPResSo or running it for the first time, please have a look at the Installation FAQ on the wiki. If you still didn’t find an answer, see Community support.
Many algorithms require parameters that must be provided within valid ranges. Range checks are implemented to catch invalid input values and generate meaningful error messages, however these checks cannot always catch errors arising from an invalid combination of two or more features. If you encounter issues with a script, you can activate extra runtime checks by enabling C++ assertions. This is achieved by updating the CMake project and rebuilding ESPResSo with:
cmake . -DCMAKE_BUILD_TYPE=RelWithAssert
make -j
The resulting build will run slightly slower, but will produce an error message for common issues, such as divisions by zero, array access out of bounds, or square roots of negative numbers.
If this still doesn’t help, you can activate debug symbols to help with instrumentation:
cmake . -DCMAKE_BUILD_TYPE=Debug
make -j
The resulting build will be quite slow but will allow many debugging tools to be used. For details, please refer to chapter Debugging ESPResSo.
If you are dealing with a segmentation fault or undefined behavior, and GDB doesn’t help or is too cumbersome to use (e.g. in MPI-parallel simulations), you can as a last resort activate sanitizers:
cmake . -DWITH_ASAN=ON -DWITH_UBSAN=ON -DCMAKE_BUILD_TYPE=Release
make -j
The resulting build will be around 5 times slower that a debug build, but it will generate valuable reports when detecting fatal exceptions. For more details, please consult the online documentation of UBSAN and ASAN.